There are on the market today, a variety of very nice but expensive sound systems for use in model locomotives. I have for many years used a sound system on my railroad that you cannot buy from any model shop, unless the model shop sold old radio/cassette players and small speakers. My way is an easy D.I.Y SYSTEM, and relatively cheap, and is explained fully below.
Have you ever considered the use of a Radio/cassette tape recorder as a means to adding sound effects all over the layout, and also lighting effects. YES, LIGHTING effects to your railroad?. If you have not, then now is the time to see if you have an old radio/cassette lying around some where. The use for the radio part of it, I will deal with a little later on.
Okay, what do we need apart from the radio/cassette to add sound effects. I would say, about eight small speakers are required, these speakers will be placed at various intervals around the layout and underneath the base boards, and wired in such a way that you can switch on or off any, or all of the speakers, if you donít want the sound on.
Why so many speakers ?, well lets say for argument sake, that your layout is 8í by 4í and the tracks simply go around the edge of the baseboards. If you were to place a speaker in each corner, and one in the middle of each straight, and wired so when the train travels around the tracks, the speakers can be switched on and off to follow the movement of the train, it would appear to anyone watching, that the loco had in fact some sort of sound effects built into the train. In actual fact only a radio/cassette player is being used plus the eight speakers and switches. (Only an illusion, but it works well.)
The same applies to any size layout, large or small. You may need more than eight speakers for your layout if it is a club layout. The principal for wiring the layout for more speakers is the same.
For my room size of 14í by 11í, eight speakers are ample. I tend to use 3" speakers, bought from a TANDY shop. Most little speakers will be 8 ohm, and I would suspect that the cassette/ radio has one 8 ohm speaker in it also, if it has not, it does not really matter, we are not talking of HI-FI quality, only a means to an end.
Any kind of on/off switches can be used. I use the small miniature switches for the speakers so as not to be confused with the track and power switches used for block switching.

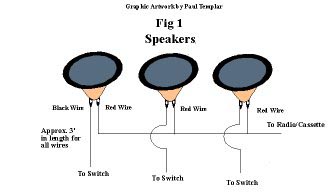
If you look at the diagram you will notice that all the speakers have been daisy chained with a wire on the right side only, (this is what I call my common return wire) and a wire on the left hanging free.
So the next step is to wire two different coloured 3í lengths of wire to each speaker so you can get at these when all speakers are in place, and underneath the layout.
Place the speakers face down on a table and solder a RED wire to the right side and BLACK to the left. Keep all speakers wired this way.
Now place the speakers underneath the baseboards and under the track. When all speakers are secured pick up all the red wires and solder them together, and run a red wire back to the radio/cassette.
Now, take out the internal speaker from the radio/cassette, and connect the red wire to one of the two wires you took the speaker from. (It does not matter which side) The other loose wire you will not need for a while.
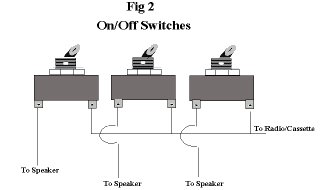
You will need some sort of panel making to house the small switches if you do not already have a control panel.
If you have a control panel now is a good time to drill and insert the small switches approximately in the same position on the control panel where your speakers are housed underneath, and solder a wire to one side only, long enough to reach it's chosen speaker. (The BLACK 3í pieces hanging down) When all switches have been so wired, run these wires to the corresponding speakers underneath. Now all that remains is to wire the other side of the switches, again, in a daisy chain manner and connect this wire to the other loose lead inside the radio/cassette, and you are ready to go.

If you have not got any sound effects on cassette then nip along to your local library, and borrow some sound effects tapes or records/CD, Once you have the desired effects on cassette, place it into the radio/cassette and switch it on. Flip the switch that corresponds to where your loco is standing on the track and start to run your train. As the train advances towards another speaker, flip this speaker on, when the train has reach the second speaker, flip the first one off, and get ready for the third speaker and switch. Carry on doing this all around the room, itís amazing the effect it will have, plus it has also added a new dimension to running trains.
You could also buy from a model shop one of those cheap sound boxes that give out a train whistle and diesel sound, and use that. All you need to do is remove the internal small speaker, and connect these speaker wires directly to the red and black wires on the radio/cassette. Whilst the cassette is playing itís sounds, just press any of the buttons, and the sound will appear at which ever speaker is switched on at the time.
The Radio Side
I mentioned earlier the radio side for lighting effects and stated I would come back to it later, that time has arrived.
You can use the radio side for yet another dimension to your railroad, in the form of a flickering light. Make sure all switches for the sound system are turned off. Now, temporarily connect two wires to the red and black leads on the cassette radio, (leave the other wires on) and connect a grain of wheat bulb to the wires.
Switch on the radio side to a music programme and slightly de-tune it, turn up the volume and watch the light flicker at various intervals. This can be used for a flickering fire if used with a red grain of wheat bulb.
If you want to experiment a little further, get an oil drum and drill out the top and bottom, paint the drum dark red inside, and grey outside. Place the red bulb at the base of the drum, drill a tiny hole in the baseboard and insert the wires through it. Take one of the wires from the red grain of wheat bulb, and connect it to the red wire already present, in the radio/cassette.
The other wire from the bulb goes to another tiny switch placed on your control panel and the other side of the switch goes back to the black wire underneath. Sit people around the drum and switch on the radio. You now have the effect of your little people keeping warm around a FLICKERING fire.
There must be other uses for the flickering light, but I have not come up with any others at the moment, perhaps some readers out there can come up with another way to use it, then perhaps I can add more to my layout.
So there you have it, a cheap sound system for your railroad and a place to keep the little people happy.
Have fun.
Written by Paul Templar
http://www.badger-creek.co.uk/
| Auran Website | Database | Articles | Trainz Website |